¶ Palo Alto FW Cheatsheet
¶ VM-100 Firewall
¶ Quick Start
Default Creds
- User: admin
- Pass: admin
¶ Things to Note
Configurations must be made in Configuration mode, which is activated with configure
Configuration mode is denoted with the # symbol before the command.
To exit config mode, type in exit.
IMPORTANT All changes must be committed.
commit
¶ Manage the Management Interface
¶ Management Interface (GUI)
Navigate to Device > Setup > Interfaces
Configure the management interface including permitted services and ip address on the left panel
Add permitted ips on the right panel
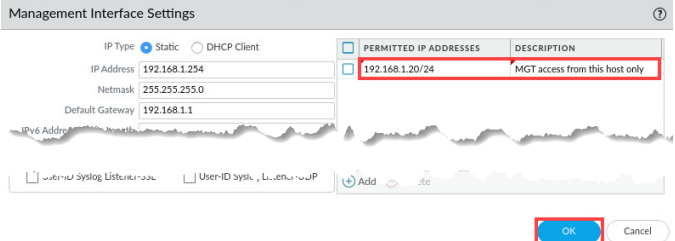
.
¶ Management Interface (CLI)
Set permitted ips
set device config system permitted-ip [IP ADDRESS]
show deviceconfig system permitted-ip [IP ADDRESS]
delete deviceconfig system permitted-ip [IP ADDRESS]
Set access to local only (I think)
set deviceconfig system permitted-ip 127.0.0.1
commit
To turn it back on:
in config mode:
set deviceconfig system permitted-ip x.x.x.x
commit
¶ Managing Configurations
¶ Via GUI
Navigate to Device > Setup > Operations
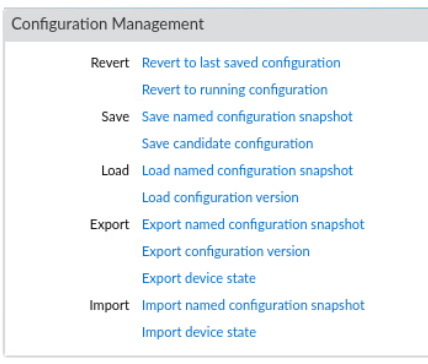
Configurations can be rolledback, saved, loaded, exported, and imported as needed via .xml conifg files.
¶ Via CLI
To see the full running configuration:
show
To view a specific section, such as network settings:
show | match <keyword>
If you want to see pending changes before committing:
show config diff
Save Configuration to a Named Snapshot
save config to <filename.xml>
Example:
save config to backup-jan.xml
Load a Saved Configuration
load config from <filename.xml>
Revert to Last Saved Configuration (Before Last Commit)
revert config
Export Running Configuration (via SCP or TFTP)
scp export configuration from running-config.xml to <user>@<server>:/path/
Example:
scp export configuration from running-config.xml to [email protected]:/home/admin/
Import Configuration
scp import configuration from <user>@<server>:/path/<filename.xml>
Then, load and commit:
load config from <filename.xml> commit
View Configuration Versions
show config audit summary
Rollback to a Previous Version
rollback to version <X> commit
¶ Temporarily Turn Off Data External Interface (if connected)
Red Team Could Be Managing the Firewall Via Data Interface
In configure mode:
set network interface ethernet ethernet1/x link-state down
commit
To turn it back on:
in config mode:
set network interface ethernet ethernet1/1 link-state up
commit
¶ Change Passwords
For the admin password:
In config mode:
set mgt-confg users admin password
¶ If necessary, disable dhcp-client if you want static IPs
Necessary if you want to do static IPs
show system info
Check next to ip-assignment: If it says "dhcp", do:
set deviceconfig system type static
¶ Check and Disallow Protocols to Firewall
show system services
In config mode:
To see what services can be disabled:
set deviceconfig system service disable-
To disable a specific service:
set deviceconfig system service disable-[SERVICE NAME] no
commit
¶ Creating Snapshots
NOTE: For your own sanity, do this after you license and fully config the firewall.
In operations mode:
scp export configuration to username@host:/home/secops from running-config.xml
¶ License Activation
¶ Method 1: GUI
Top Bar: Device > Under License Managemenet > Activate feature using authorization code
Enter the code
¶ Method 2: CLI
If we have the License Code (untested):
request license activate code
¶ Update Malware Signatures
Top Bar: Device > Dynamic Updates > check now
Click around, and download stuff
¶ Custom Security Profiles (For Layer2 Network Deployment)
¶ Anti-Virus
ACTION TAB
-
For North-South traffic, set actions to "drop"
-
For East-West, set actions to "reset-both"
WILDFIRE INLINE ML TAB
- Enable Inline Machine Learning
¶ Anti-Spyware
SIGNATURE POLICIES TAB
North-South traffic:
- For critical and high severities, do Action:"drop".
- For Severity: "any", do Action: "alert".
East-West traffic:
- Severity: "critical" and "high", do Action: "reset-both"
- For severity: "any", do Action: "alert".
DNS POLICIES TAB
Set DNS Security policy to "sinkhole". This will allow you to capture intell on the red team
2 Methods:
-
Set up your own sinkhole server
-
Use the loopback address as the sinkhole
¶ Vulnerability Protection
North-South traffic:
- For critical and high severities, do Action:"drop".
- For Severity: "any", do Action: "alert".
East-West traffic:
- Severity: "critical" and "high", do Action: "reset-both"
- For severity: "any", do Action: "alert".
¶ URL Filtering
Categories Tab
At the MINIMUM (list should probably be elaborated):
Block the categories:
- command and control
- grayware
- hacking
- malware
- newly registered websites
- proxy avoidance and anonymizers
- ransomware
Set everything else to alert
Inline ML Tab
Set everything to block
¶ File Blocking
Block downloading and uploading of dangerous files.
Note: NOT a comprehensive list.
File types to block:
- asp
- aspx
- bat
- ps1
Set an alert for all uploads and downloads
¶ Wildfire Analysis
Just use the default unless suggestd otherwise 
¶ Custom Security Groups
Top Bar: Objects > Security Profile Group
The Security Profiles you made go INSIDE the Security Groups that are about to be made.
There are 2 to be made:
North-South SG
Assign the security profiles with the Action: "drop" to this group.
After you do this, assign the North-South SG to your North-South Allow Security Policies (Which I believe you do in top bar: Policies)
East-West SG
Assign the security profiles with the Action: "Reset-both" to this group.
After you do this, assign the "East-West SG" to your East-West Allow Security Policies
¶ Turning on Decryption
¶ Create a Trust Certificate
Top Bar: Device > Certificate Management > Certificates
Cert Type: Local
CertName: Forward-Trust (Or whatever you want)
Common Name: (If we're doing a Layer2 Network Deployment, use an IP address available in the subnet)
Signed By: (Checkmark Certificate Authority)
In certificate information:
- Checkmark "Certificate Authority" and "Forward Trust Certificate"
¶ Create an Untrust Certificate
Top Bar: Device > Certificate Management > Certificates
¶ TODO LIST
- How to enable / disable GUI
- How to install malware signatures
- Write about deployment types
- How to use GUI
- Better practices
- What to do if we lose control
- How to actually import the snapshot .xml.
- Add info about turning on decryption